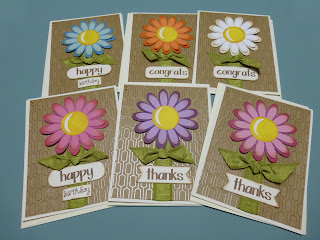
Welcome to the Pink & Main and Glue Dots Blog Hop!
Here are the details:
Made By: Amanda Tibbitts
Time: about 1.5 Hours
Level: Intermediate
Size: Six A2 Cards
Here’s what you’ll need to get started:
Adhesive:
Glue Dots® Glue Lines
Glue Dots® Micro Dots
Glue Dots® Permanent Tape Runner
Materials:
Baby wipes or stamp cleaner
Mini MISTI or an acrylic block
6 110lb cardstock card bases cut at 4 ¼” x 8 ½”
6 patterned cardstocks cut at 4” x 5 ½”
Scraps of ivory cardstock to do the stamping
6 envelopes
6 Die Cut Flowers at 3”
Ribbon
Twine
Washi Tape
Faux self-adhesive pearls
Distress Oxide Ink in Vintage Photo and ink blending tool
Clear Box
Tools:
Cuttlebug or other manual die cutting machine
Scissors
Bone Folder
Directions:
Step 1:
Add some distress ink to each of the petals on your die
cut flower, as well as the center, and anywhere else you want. Use the Glue Dots® to adhere the flower
pieces together. Set these aside.
Step 2:
Fold the 4 ¼” x 8 ½” card bases in half and use the bone
folder to really crease them. When using
heavier paper you have to really crease them to make them crisp!
Step 3:
On the 4” x 5 ½” patterned cardstock, measure a length of
ribbon that will reach about ½” up the panel.
Use a completed flower to make sure it reaches. Cut this piece so a bit runs over the bottom
edge. Use a Glue Dots® Glue Line on the
backside in the middle of the patterned cardstock. Stick the ribbon that is a little longer than
the panel to the glue line. Wrap it
around the front of the panel, adding two more glue lines to the ribbon. Stick it down to the patterned panel. Then
run some Glue Dots® Tape Runner around the back of the patterned panel and
adhere it to a folded card base. With a
bit more ribbon, tie a not and trim the ends on an angle to somewhat mimic a
leaf shape. Use Glue Dots® Micro Dots to glue this to the ribbon stem. Place a finished flower over the top to make
sure the leaves get in the right spot!
Once you’ve placed the leaves, glue the flower to the cardstock with a
combo of Glue Dots® Tape Runner and glue lines.
Step 4:
With the MISTI, and the Pink & Main stamps, stamp the
sentiments from the super cute Stitched Greeting set with the Distress Oxide
Ink.
Step 5:
With the coordinating dies and a piece of washi tape,
line up the die you want to use for each sentiment and run it through the
Cuttlebug.
Step 6:
Add some distress ink to the edge of each sentiment and
use the Glue Dots® Glue Lines to glue to the bottom of the ribbon stem.
Step 7:
With the faux pearls, add two in the left top corner.
Step 8:
Add an envelope to each card and fill the clear box with the cards and tie the twine
around the box.
This set is fairly quick to put together and looks so
cute! Who doesn’t love blank cards to
use?!
Thank you so much for hoppin' along with us today...
Now for the fun part!
Now for the fun part!
Now through Tuesday September 25th, join us for a fun joint blog hop between Pink & Main and Glue Dots. Our teams will be sharing lots of beautiful projects featuring products from both companies.
To enter into the drawing for the $25 gift certificate, you just need to comment on EACH blog throughout the hop. The lucky winner will be randomly selected and announced on Wednesday, September 26. Good luck and have fun!
Here is the list of blogs in this hop if you get lost along the way:


